The measurement log records each measurement and change in Register contents. The number of measurements and Register changes saved is set from the Measurement Action Dialog, which is accessed by long pressing the Measure button.
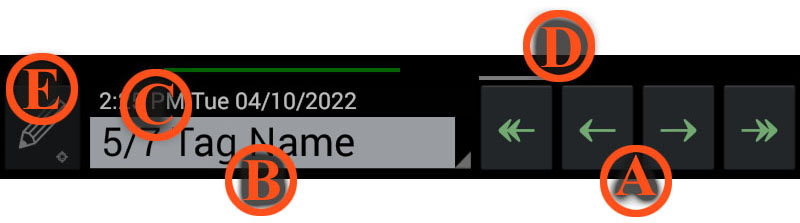
A - At the bottom
right are the four main navigation buttons. In the default
navigation mode, these step back through previous measurement
values. Only the Measurement changes with each step, all the other
Registers retain their latest values. Only Measurements that have
been marked "Keep" will be visible, although measurements that
have their status to "Discard" will remain visible until the
Navigation Controls are hidden, so that you can change your mind
about them. To retrieve Discarded measurements after they become
invisible, change to the Step:
Register Changes navigation mode - see bellow for details.
Note that you can't change previous Measurement or Register
values. Saving a previous measurement to a Register updates the
latest state of the Register. Also note that while Readouts will
show the selected previous Measurement, they always use the latest
Register values in their calculations. See Step: Register Changes
for information on retrieving previous Register values.
B - At the mid lower left is the tag
name associated with the measurement. This is also acts as the Navigation Menu. The
default tag name is set from the Measurement Action Dialog,
which is accessed by long pressing the Measure
button. A tag name is a way of grouping associated measurements.
The numbers to the left of the tag name show which measurement
this is within that contiguous group of tags. A tag group can be
use as a point to jump to and as a way of selecting measurements
to Export.
You can change the tag of a measurement using the Change This Tag menu
item, or a range of Measurements by Marking the start and End, and then using
the Change Marked Tags
menu item.The background color of the approximates the color
measured.
C - Above the Tag Name is either the
Date the measurement was made, or the Time since it was made. You
can change the display to show age or date from the Navigation Menu.
D - Above all the navigation controls
and measurement information are the location bars. The lower white
bar shows the current measurement positioned left to right, left
being older and right being newer. The width of the bar will get
smaller as more and more measurements are in the log. Above the
white bar is a green bar showing the range of measurements
currently selected by Marking the start and End.
The bar will be orange if only one of start or end is selected, or
if start and end are reversed.
E - To the left is the Meta-data menu and buttons. A Long Press will bring up the Meta-data menu where you can select one of the three types of meta-data associated with each measurement:
Touching the Notes button will show or hide any notes associated
with the measurement. If there are no notes the button will be
greyed. If there are no notes, then touching the notes text will
allow you to add notes. If there are notes, then double tapping
the text will allow you to edit it.
If there is no photo, then the button will be greyed. If there is
no photo and this is the latest measurement, then touching the
button will allow you to take a photo and attach it as meta data
to the measurement. If there is a photo then touching the button
will show you the photo. If there is already a photo, or this is
not the latest measurement, then double tapping the button will
let you replace the photo. If the photo has been deleted from the
Android devices gallery, then the Photo button will look like
this: ![]()
By default navigation is amongst Measurements marked as "Keep",
with all the other Registers retaining their latest values. By
selecting this item, navigation is changed to be amongst all
changes to Register values. The controls change to using angle
arrows with in yellow, as a hint that you are in Register step
mode.

In addition, there are ten register change hints between the tag
name and controls. If the Measurement, Reference or 8 other
Registers have a value in them, there will be a corresponding
letter will be displayed as a hint. On the step where the value
changes, it will be shown in reverse colors.
If you need to retrieve a previous set of Register value to be
able to configure Readout Values the way they were previously, you
can use the Copy Registers(s)
selection from the Measurement Menu.
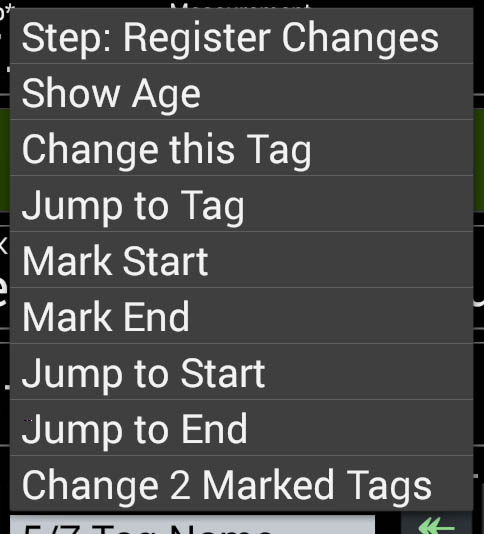
When in Step: Register Changes mode, this menu item switches back
into the default of stepping through just the previous Kept
measurements.
By default the date that a measurement or register change
was made is shown. Selecting this item switches over to showing
how old the measurement is.
If currently the age of the measurement is being shown, then
selecting this item will switch back to the default of showing the
date that a measurement or register change was made.
You can change the Tag Name for the current measurement by
selecting this menu item. This is a good way of starting a new Tag
Group after taking a measurement.
To start a new tag group before taking the first measurement, use
the Measurement
Action Dialog.
Selecting this allows you to jump directly to the start of a Tag
group.
Selecting this will mark the current Measurement as the start of
selection. Note that the Date/Age will show a left to right
graduated background for the start Measurement.
Selecting this will mark the current Measurement as the end of
selection. Note that the Date/Age will show a right to left
graduated background for the end Measurement, while while other
Measurements within the selected range will show a solid green
background for Age/Date. If there is only one of start or end, or
they are reversed, then the start and end are show in orange.
If there is a Measurement marked as the start, then jump to it.
If there is a Measurement marked as the end, then jump to it.
If a range of Measurements is marked between start and end, then
change all the Tag Names of them.