Measurement View
The Measurement View is the default when starting ColorMeter.
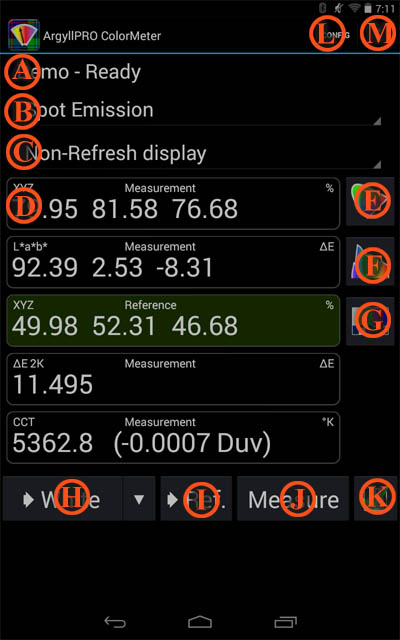
A -The top line shows the
instrument type if connected, and its current status.
B - The drop-down menu
below this shows the current measurement mode and allows
the mode to be changed. Instruments that can be mechanically
configured in different ways, such as the ColorMunki Spectrometer
or Eye-One Display Pro will change the list of available modes
when they are re-configured. The last selected measurement mode
will be remembered for each instrument configuration. Note that
the Emission and Ambient Flash measurement modes are intended to
measure photographic flash light Luminance and Illuminance
respectively, and are designed to exclude non-flash lighting
contributions.
Measurement Mode
|
Quantity Name
|
Y Units
|
Emission
|
Luminance |
cd/m2
|
Ambient
|
Illuminance
|
lm/m2, cd.sr/m2,
lux
|
Emission Flash
|
Surface Luminous
exposure |
cd.s/m2
|
Ambient Flash
|
Luminous
exposure
|
lm.s/m2,
cd.sr.s/m2, lux.s
|
Reflective
|
Reflectance
|
%
|
Transmissive
|
Transmittance
|
%
|
C - The next
drop-down menu shows the current display calibration mode if
applicable to the instrument and measurement mode. Colorimeters
typically have different calibration settings for different types
of display technologies, and this menu allows selecting the
appropriate calibration. This menu also allows choosing between
refresh display measurement modes and non-refresh modes for
instruments that make this distinction. If display calibration is
not relevant for a particular instrument or its measurement mode,
then the menu will be blank. Installed
CCMX (Color Correction Matrix)
and CCSS (Color Correction
Spectral Sample) files will appear in this menu.
D - Below the two menu
is the Readout area. This consists of a vertical list of
individual Readouts. The list is scrollable when it
exceeds the available screen space.
Tap a Readout to add new Readouts or to configure them
Slide or fling a Readout left and
then up or down to re-arrange them. They can also be arranged from
the Readout Configuration Dialog.
Slide or fling a Readout
right to delete it. They can also be deleted from the Readout Configuration Dialog.
Double tap (or two finger tap) a Readout
to set a value (color calculator
operation, or setting reference values). Note that not all readout
types are settable, since things like CRI don't contain enough
information to completely define a color value, and an error dialog
will indicate this.
Long press a Readout to
trigger the system text selection & copy to Clipboard.
Readouts with a single line of output will have the numeric
information selected and ready to copy to the clipboard. Other
readout types will have the output section touched selected.
Touching "Select All" in the Text Selection Action Menu will select
all readout sections, and format the string with extra information
such as the Readout source, Colorspace, Units, Date measurement was
taken etc. i.e.:
|
Normal Readout, default
selection: |
"95.35 -0.57 2.00" |
|
Normal Readout, Select All:
|
"Measurement L*a*b*: 95.35
-0.57 2.00 ∆E Oct 15 2014 1:18:05 PM" |
|
Exposure Calculator, default
selection: |
"f/0.9" |
|
Exposure Calculator, Select All:
|
"Measurement: Shutter:500 Aperture:f/0.9
ISO:400 Adjustment:0.0 Oct 15 2014 1:18:05 PM" |
|
Named Color Swatch, default
selection:
|
"Warm Yellow 1234" |
|
Named Color Swatch, Select All:
|
"Warm Yellow 1234 (2.5 ∆E 2K) Oct 15 2014
1:18:05 PM" |
To the right of the readouts are buttons to switch to other views:
The top right hand button - E
- switches to the Chromaticity
Graph view.
The next right hand button - F
- switches to the Spectral
Graph view.
The last right hand
button - G - opens the Video Test Patch Generator Dialog
dialog, for selecting the ChromeCast that will display the test
patches, configuring the location, size and background of the test
patch, as well as offering a menu of pre-set Video test cards that
can be displayed.
At the bottom of the view is a row of buttons:
H - The
leftmost button stores the last measurement in one of the 8
Primary-Color References ("Sources" or "Registers"). This auto
switches to the most likely color given the measurement value, but
can be overridden by touching the selector adjacent to the
button 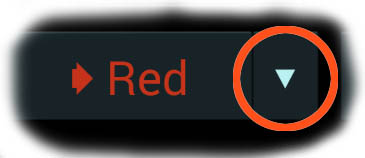 and
then touching the primary color to store into. Touch somewhere else
on the screen to avoid storing the measurement. The Primary Color
references are used for a variety of purposes, such as helping to
computing some Readout values, as well as providing a means to plot
a color gamut. It's also possible to use them as general references.
(Note though that all Readouts that compute differences do so
between their Source Register and the Reference Register.)
and
then touching the primary color to store into. Touch somewhere else
on the screen to avoid storing the measurement. The Primary Color
references are used for a variety of purposes, such as helping to
computing some Readout values, as well as providing a means to plot
a color gamut. It's also possible to use them as general references.
(Note though that all Readouts that compute differences do so
between their Source Register and the Reference Register.)
I - The middle
left button stores the last measurement in the Main Reference. This
is the value used for most of the comparative Readouts such as delta
E's, Reading Delta's, RGB Adjustment Reading etc.
J - The middle
right button starts a measurement, or alternately the instrument
button (if it has one) can be used to start a measurement.
A long press of this button brings up the Measurement Action Dialog,
where you can change the measurement action from single to
continuous measurement. When in continuous mode, this button is used
to start and stop measurements. To make a flash measurement in Flash
measurement mode, press and hold the instrument button, trigger the
flash, and then release the instrument button.
K- The rightmost
button has two related functions. A single press toggles the state
of the current measurement between Keep  , and Discard
  . Discarded measurements are not deleted, but they
will be ignored in the default Measurement Log navigation, and won't
be exported. A long press toggles the Measurement Log Navigation controls
Visibility.
. Discarded measurements are not deleted, but they
will be ignored in the default Measurement Log navigation, and won't
be exported. A long press toggles the Measurement Log Navigation controls
Visibility.
At the very top right is the Android menu items:
L- CONFIG brings
up the Configuration Menu,
which provides a quick way of restoring from one of your saved
configurations, as well as providing a button to access to the Configuration Dialog and Options Dialog.
M
- The Measurement Menu shows
various optional commands, depending on the current mode and state,
such as invoking instrument calibrations, measuring refresh rate, or
clearing all the measurements.